How I Built an Entire Program in Kajabi Using Claude and Kajabi's MCP
I built a full program in Kajabi in one afternoon and I never clicked into a single builder. The course, the community, the opt-in, the sales page, the offer, and a 7-day email sequence all got built out of a conversation.
The tool that makes this possible is the Kajabi MCP, which connects your Kajabi account straight to Claude. So instead of opening Kajabi, hunting for the right tab, and building every piece by hand, you tell Claude what you want and it builds it inside your account for you to review.
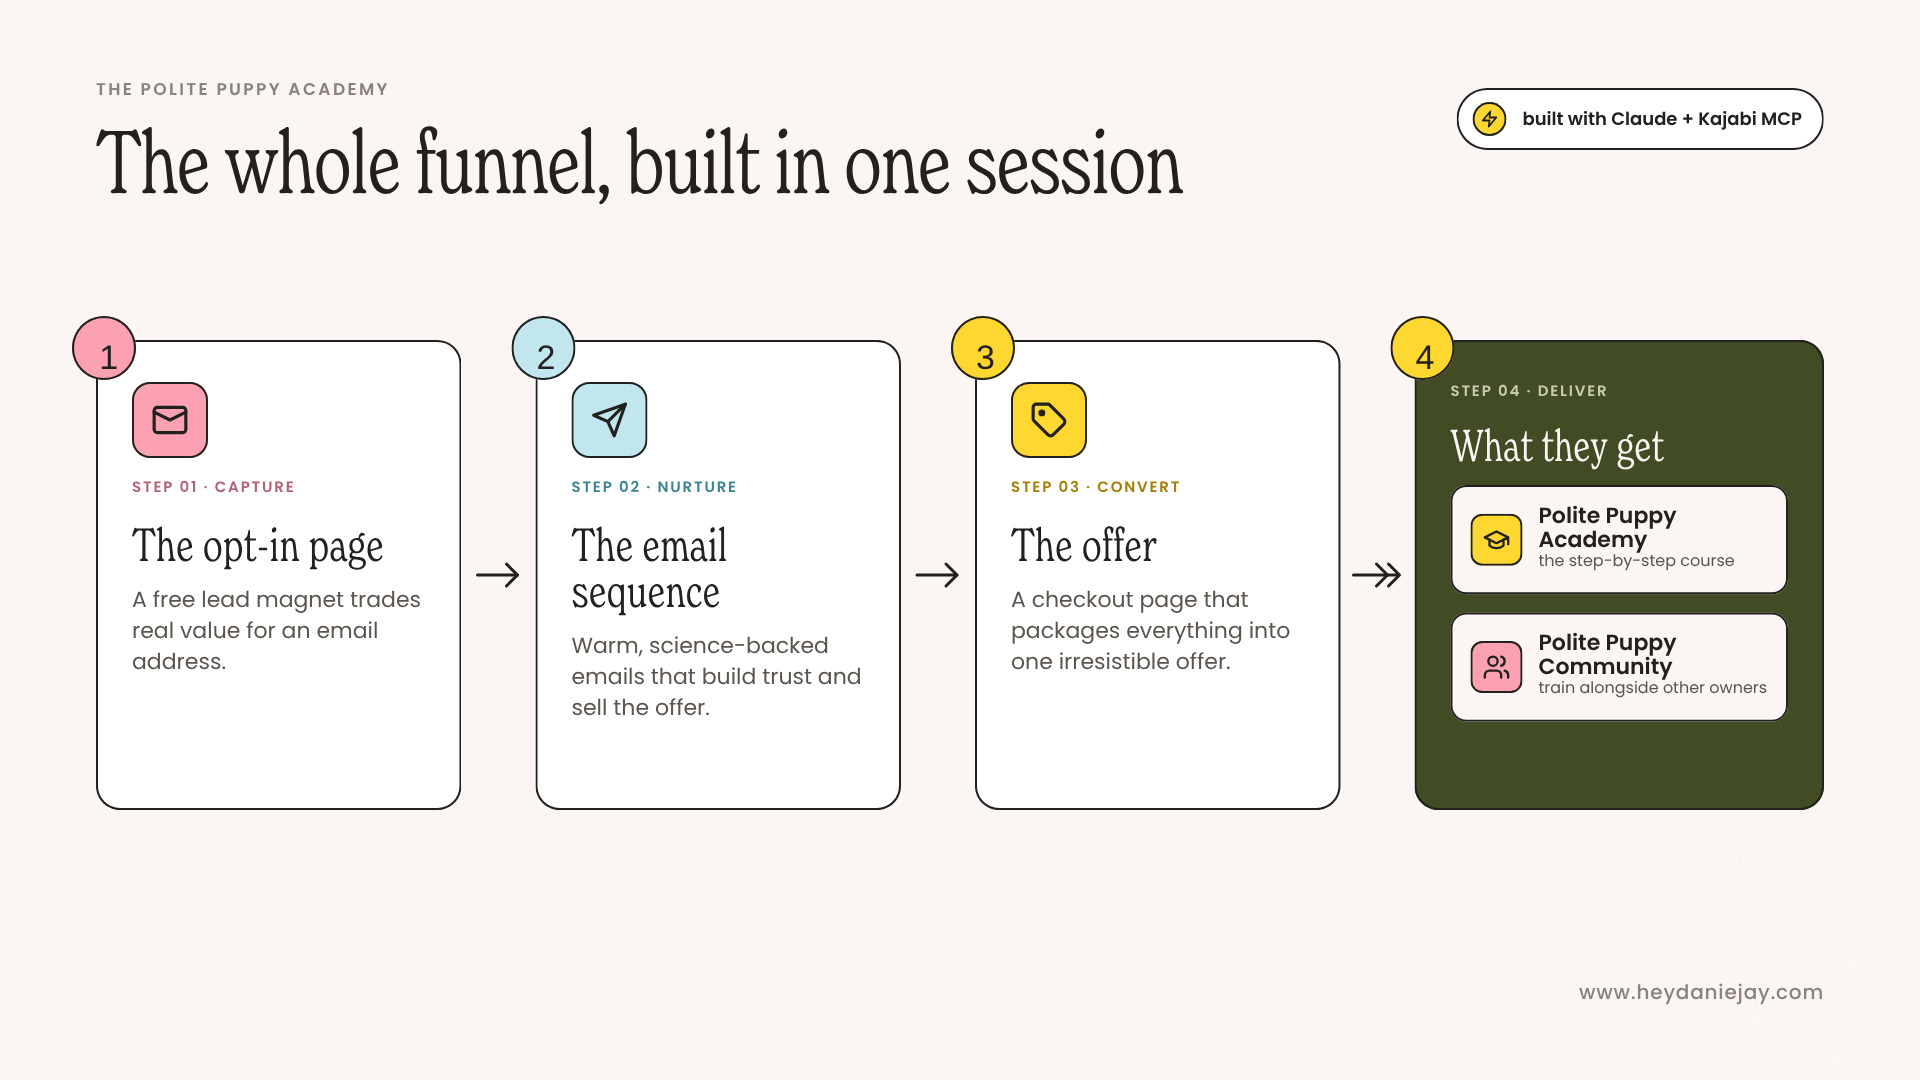
To show you how this actually works I built a fake program from scratch called Polite Puppy Academy, a $99/month dog training membership for brand new puppy owners. I'm walking you through every single piece I built so you can run the same process on your own program.
I used Claude for this, but the same connection works in ChatGPT, so I'm giving you both setups below.
You'll walk away with:
- The setup for Claude and for ChatGPT, including the plan catch on the ChatGPT side
- My exact prompts for the course, community, opt-in, sales page, offer, and email sequence
- The one step most people skip that ruins their output
- What the build actually looks like in real life, since it's more of a conversation than a checklist
- The three gotchas I hit so you don't have to
This post is all about how to build your entire program in Kajabi using Claude and the Kajabi MCP.
Step 1: Connect Kajabi to Claude or ChatGPT
Don't use Kajabi yet? Get my extended 30-day trial link here.
To connect Kajabi to Claude/Chat you don't need to touch any code. PHEW. It's one URL and an approval screen, and it works in either tool.
The server URL, for both: https://mcp.kajabi.com/mcp
Do one thing before you start. Make sure you're logged into the right Kajabi account in your browser, because the approval screen uses whatever session is already open.
If you're using Claude
You need a paid Claude plan (Pro, Max, Team, or Enterprise).
- Go to claude.ai and sign in
- Click your profile, then Settings, then Connectors
- Click Add custom connector at the bottom of the page
- Name it Kajabi and paste in the server URL (https://mcp.kajabi.com/mcp)
- Click Add, then approve the Kajabi consent screen when your browser opens
- Open a new chat and switch the Kajabi connector on from the tools menu
If you're using ChatGPT
- Click in the left-hand corner on the name of your account
- Click Settings, then Plugins, then Browse Plugins
- In the left-hand corner, click the + (add a new Plugin)
- Name it Kajabi, paste in the server URL(https://mcp.kajabi.com/mcp), and set Authentication to OAuth
- Save, then approve the Kajabi consent screen
- In a new chat, click the + icon (or Tools), go to , and enable Kajabi
Then pick your permissions
However you connect, the consent screen gives you a list of checkboxes for what your AI tool is allowed to do. Read them and grant what you actually need.
The two I'd think hardest about are editing theme code and adding account users, because those are the changes that are the most annoying to undo.
For me personally, I allow everything EXCEPT adding account users.
Boom, you're good to go. The connection authorizes through your Kajabi login, so there's no API key or developer setup to mess with.
Before you build anything, test it. Start a new conversation and type: "List my Kajabi sites." If your site name comes back, you're connected.
Step 2: Give Claude the brief AND the build list
A lot of people skip this step, and then their whole program sounds like a robot wrote it. 0/10 would recommend. Don't skip this.
The MCP gives Claude the ability to build things inside Kajabi, but it doesn't magically know your voice, your audience, or your strategy. That part is still on you, and it's exactly what I mean when I talk about being the AI director instead of just the person typing.
So before I asked for a single thing, I pasted in this. Notice it's doing two jobs: telling Claude who this is for, and telling Claude everything we're building together.
📝 Prompt
"Before we build anything, here's the full picture.
Part 1: Who this is for and what it is
Brand: [your brand name]
Who it's for: [your audience, be specific about their situation, not just demographics]
The transformation: from [where they start] to [where they end up]
The offer: [price, structure, what's included]
Voice: [three to five words for how you sound]
*Upload your brand voice guide if you have one, your website, examples of your writing/blog posts, etc. (Basically anything to help AI better know who you are, what you offer, and why)
Part 2: What we're building together
Here's everything I need built in Kajabi for this program:
1. The course, with modules and lessons
2. The community, with a welcome announcement and conversation starters
3. The offer at $[X], granting access to both
4. The terms and conditions page for the course/community
5. The sales page
6. The opt-in, meaning the PDF and the landing page for the freebie
7. The 7-day email sequence that goes out after the opt-in
8. The tags and segments that connect it all
How I want to work
Take me through these one at a time and tell me what's next after each one. Ask me questions before you build if anything is unclear. Save everything as a draft so I can review it in Kajabi before it goes live. Let's start with number one."
If you already have a brand voice guide, paste that in too.
Once Claude has that whole picture, it stops waiting for you to remember what comes next. It builds the course, shows you what it made, asks if you want changes, and then says something like "ready to move on to the community?" You end up in a back and forth instead of typing ten separate commands.
So read the steps below as your map, not as a script you have to type word for word. That's the real reason Part 2 of that prompt matters. Claude can only walk you through the build if it knows what the whole build is.
Step 3: Build the course shell
Now we build. I gave Claude the modules I wanted, plus a Module 0 to open with, and let it fill in the lessons.
🐶 Prompt
"Using my Kajabi MCP, create a new course called [your course name]. Start with a Module 0 called Start Here that includes a welcome lesson. Then build these modules: [list your modules]. For each lesson, give me a title, a one-sentence outcome (what the student can do after this lesson that they couldn't before), and a two to three sentence description written in the brand voice above."
It built the whole course structure inside my account. Modules, lessons, descriptions, all of it.
Here's what I love about this. Reverse engineering your modules is the thing that stalls people for weeks, and now you're watching a draft of it show up in about ninety seconds. You get to edit instead of stare at a blank page.
Just know that Claude is building the container and the copy here. The videos, the workbooks, the images, and the actual teaching are still yours. The MCP won't add pictures, so you'll drop those in yourself.
Step 4: Set up the community
The community is where people stay, and honestly it's a big part of why memberships keep renewing. This is also where I got the biggest time savings.
I had Claude create the community, draft the welcome announcement, a conversation starter, and a poll to get new members participating during their first week.
🐕 Prompt
"Using my Kajabi MCP, create a community called [your community name]. Then draft a welcome announcement that tells new members exactly what to do in their first 24 hours, and ends with one specific action, not a general 'introduce yourself.' Then draft one conversation starter post for the main channel that gets members thinking about [your niche topic]. It should be answerable in a single sentence so people actually respond instead of scrolling past. Finally, draft a poll asking where members currently are or how they're feeling about [your niche topic], so you get an early read on your audience."
⚠️ Heads up: Community posts and forms don't create as drafts, they go live the second Claude makes them. Everything else (offers, pages, emails, courses) lands as a draft for you to review. So for community stuff, have Claude show you the copy in the chat first, approve it, and then tell it to post. And just like the course, the MCP won't add pictures, so any images for your community are on you to drop in.
Step 5: Create the offer
The offer is what people actually buy, and it's what connects their payment to the stuff they get access to.
💰 Prompt
"Create an offer called [your program name]. Price it at $[X] per [month/one-time]. Grant access to [everything this offer unlocks]. Save it as a draft, then tell me if anything about the access grants looks off before I approve it."
Then I had it draft the checkout pieces:
"Write the offer description and the thank you page copy in my brand voice. Keep the thank you page focused on one next step: joining the community."
Now the part nobody wants to deal with: your terms and conditions.
Anything with recurring billing needs them, and a membership needs them more than most, because you're charging someone every month until they tell you to stop.
Give your AI your business name and your state, and have it look up what actually belongs in these before it writes anything. Then have it build the whole thing as a landing page so you end up with a real URL you can point to.
📄 Prompt
"I need terms and conditions for [your program name], a $[X]/[month/one-time] [membership/course] that includes [what's included]. My business is [your legal business name], based in [your state].
First look up what online course and membership terms and conditions are normally expected to cover, and anything specific to [your state] that applies to recurring subscriptions and online sales. Then write a base set of terms that covers at minimum:
• What's included and how access works, including any group coaching, community, or private coaching add-ons
• The $[X] billing, payment plan options if you offer them, when it renews, and how someone cancels
• The refund policy, including any conditions someone has to meet to qualify
• What happens to their course and community access after they cancel or if the program closes
• Confidentiality, meaning what participants can and can't share about other members or about you
• Community rules and what gets someone removed
• Intellectual property, meaning what they can and can't do with my content, including anything I give away for free
• Disclaimers, meaning I'm not providing professional, legal, financial, or medical advice, and I don't guarantee results
• Force majeure and other events outside my control
• Assignment and my right to modify these terms
• Termination, meaning when I can end someone's access
• Indemnification
• How disputes get handled and which state's law applies
• An earnings disclaimer if I make any income or result claims in my marketing
Tell me anything you're unsure about or that you think I need a lawyer to decide. Then create it as a landing page called [your program name] Terms and Conditions."
Once that page exists, grab the link and connect it to your checkout:
- Copy the URL of your new terms and conditions page
- Open your offer and go to the terms and conditions setting
- Choose Custom Terms and Conditions
- Type: Read Terms and Conditions here.
- Highlight the word here and hyperlink it to your terms and conditions page
Now anybody at your checkout can click through and read the whole thing before they pay.
Do the same for a privacy policy while you're in there, since your opt-in page is collecting email addresses.
That prompt gets you a real starting point instead of a blank page. It does not get you legal advice. AI can be confidently wrong about the law, and it doesn't know your business or your state the way a real attorney does. Have one read your terms before you take a single payment.
If you'd rather start with something an attorney actually wrote, that's the route I go. I use Creative Contracts for my business. They're attorney-drafted templates built for online creators, including course terms of use and privacy policies, so you're customizing real legal language instead of hoping the AI got it right. (Affiliate link, so I earn a small commission if you buy through it, at no extra cost to you.)
Whatever route you take, make sure the refund policy on your page matches what you actually do when someone asks for their money back.
Step 6: Build the sales page
Here's where handing Claude a real framework pays off. I didn't ask for "a sales page." I gave it my structure and had it fill in the sections.
🔥 Prompt
"Create a landing page for the [your offer name] sales page. Before you write it, run each section through the grunt test: someone should understand what this is, how it helps them, and what to do next within 5 seconds of landing on it. Follow this structure:
1. Above the fold: headline, subheadline that states the transformation, one CTA button
2. Introduce the problem, framed as 'does this sound like you' with real pain points, not the polished version
3. Relate to the reader with a short story that shows you've been where they are
4. Envision the transformation, painting a picture of life on the other side, not just what's included
5. Introduce [offer] as the solution, and say why it's the best or fastest way there
6. Content breakdown, written as benefits not features. Every line finishes 'so you can ___,' not just what it covers
7. About the instructor, with a personal story that builds credibility
8. Social proof (testimonials, leave placeholders)
9. What makes this different from other options
10. Urgency or bonuses if you have them
11. Pricing, clearly stated with payment plan options if you have them
12. Risk reversal, something that lowers the risk of buying
13. FAQ that handles objections people actually have, not softball questions
14. Closing statement that names the cost of staying stuck, then one final call to action
Write it benefit-first throughout. Focus on what changes for them, not on how many modules there are. Save as draft."
Then I read the whole thing and rewrote maybe a third of it in my own words, because AI copy on a sales page always needs your fingerprints on it. Still way faster than starting from nothing.
PRO TIP: I recommend using Pexels for pictures on your sales page. Pexels has free stock photos, royalty free images & videos shared by creators: https://www.pexels.com/
Step 7: Build the opt-in
This is your freebie plus the form that captures the email. For Polite Puppy Academy I used a starter kit for that first week home.
📩 Prompt
"Create a form called [your freebie name] Opt-In with first name and email fields. Then create a landing page for it. Use a headline that speaks directly to [the specific problem this freebie solves], three bullets that each promise one micro-result instead of just listing what's inside, and one call to action. Tag everyone who opts in with '[your tag]'."
That tag is doing a lot of work back there. It's what triggers your email sequence and what lets you segment people later on.
Step 8: Build the 7-day email sequence
This is the piece that used to eat a whole week of my life.
✉️ Prompt
"Create an email sequence called [sequence name] that triggers off the '[opt-in tag]' tag. Seven emails, one per day. Here's the job of each one:
• Day 1: welcome them, deliver the freebie, one quick win they can use today
• Day 2: your story, specifically the struggle that led you to build this, not just your credentials
• Day 3: establish your authority and give one more piece of real value, something useful whether or not they ever buy
• Day 4: a success story or case study, someone who was where they are and got the result
• Day 5: introduce your paid offer and connect it directly to the transformation you've been building all week
• Day 6: handle the objections and questions that actually stop people from buying
• Day 7: a reminder and final call to action, with the biggest objection handled one more time
Give me three subject line options per email. One call to action each. No em dashes."
Seven emails drafted and sitting in my Kajabi account ready for me to edit. That was the moment this whole thing clicked for me.
Step 9: Wire up the tags and segments
Tiny step that pays off later. This is the plumbing that makes everything talk to each other.
🔗 Prompt
"Create tags for '[opt-in tag]', '[member tag]', and '[cancelled tag]'. Then create three segments: everyone who has the opt-in tag but hasn't purchased, everyone tagged '[member tag]', and everyone tagged '[cancelled tag]'. Tell me what each segment is useful for so I know when to actually use it."
Now you've got a warm list you can actually sell to down the road.
Step 10: The one thing you have to wire by hand
Do not skip this one, because without it your funnel is a bunch of beautiful pieces that don't touch each other.
The MCP cannot create automations. Which means it cannot connect your opt-in form to your email sequence. Claude will build the form. Claude will build the sequence. Claude cannot tell the form to trigger the sequence. That rule lives in a part of Kajabi the MCP doesn't reach.
You do it, and it takes about forty seconds:
- Go to Marketing → Forms and open your opt-in form
- Find Automations and add one
- Trigger: Form is submitted
- Action: Subscribe to Email Sequence
- Pick your sequence
- Save
That's a Basic Automation, so it works on every Kajabi plan.
Ask Claude for your homework list before you close the chat:
Give me the full list of everything that still needs to be done by hand
in the Kajabi admin, with a direct link to each one.
Mine came back as: wire the form to the sequence, drop in the real blueprint PDF link, upload all the images, swap the placeholder testimonials, set the checkout terms and conditions field, and publish the drafts. Six things, all fast, but you have to know they exist.
Step 11: Review everything in Kajabi before you publish
Everything except the community posts and forms landed as a draft, which is exactly how it should be. I went through Kajabi page by page, fixed the copy that didn't sound like me, uploaded my images, and hit publish.
Please don't skip this part. The MCP moves fast, and fast without a review step is how a typo ends up living on your sales page.
Three things that will save you a headache
1. Close your Kajabi editor tab before Claude makes changes. If you have a page open in the Kajabi editor while Claude is editing that same thing, whoever saves last wins and Kajabi will not warn you about it. I lost a round of edits learning this one. Easiest habit is to tell Claude when you're done editing, and let it tell you when it's done.
2. One job per prompt. If you say "build my whole funnel" you're going to get mush. If you say "create the offer, price it at $99 a month, grant access to the course and the community," you get exactly what you asked for.
3. It doesn't do everything. Analytics and payment processing are still on you inside Kajabi. The MCP is for building and managing your content, and at that it's really, really good.
Bonus: if you ever want to cut the connection, it lives in Kajabi under Settings, then Integrations & Webhooks, then AI Assistants. You'll see every AI tool you've connected and when you authorized it, and you can disconnect any of them from there.
Final Thoughts
By now you should know how to:
✅ Connect Kajabi to Claude or ChatGPT in about five minutes
✅ Set up the brand context and build list that make the output actually usable
✅ Build a course, an offer, and a community from a conversation
✅ Draft an opt-in, a sales page, and a full email sequence
✅ Get a first draft of your terms and conditions, then get a human to check it
✅ Wire up the tags that connect it all together
✅ Review and publish without wrecking your own edits
The thing I keep coming back to is that the MCP didn't do the strategy for me. I still had to know who Polite Puppy Academy was for, what the transformation actually was, and how the funnel needed to flow. What changed is that the building part stopped being the bottleneck.
You're still the director. This just hands you a really fast crew.
This post was all about how to build your entire program in Kajabi using Claude and the Kajabi MCP.
🎬 Want to Watch Instead?
If you'd rather see me actually build this out, I walk through the whole thing here: https://youtu.be/RaU_xC5BPco
Want to try it yourself? Grab a 30-day Kajabi trial with my link: https://heydaniejay.com/kajabi
Stay connected with all Danie's tips and tricks!
Join my mailing list to receive YouTube tips, encouragement, and personal branding hacks.
We hate SPAM. We will never sell your information, for any reason.
